Eclipse configuration
Eclipse is the preferred tool for the development of source code related to the MARTe project. In particular it promotes and guides the implementation of the framework coding standard and rules.
Prerequisites
Eclipse IDE for C/C++ Developers; (version used for this tutorial: Oxygen.3 Release (4.7.3))
Git clone of the MARTe2 development infrastructure;
In the following instructions, it is assumed that this is cloned into a folder named
MARTe2-dev.
Configuration
Open Eclipse;
Click on File → New → Makefile Project with existing code;
In the section Toolchain for Indexer Setting:
Select <none> if you are developing Microsoft Windows;
Select Linux GCC if you are developing in Linux;
Write MARTe2-dev as the Project Name;
Point the Existing Code Location to the
MARTe2-devdirectory (the one cloned before);Press Finish;
Open Window → Preferences;
Select C/C++ → Code Style → Code Templates and click on Import;
Select the file
Docs/Assets/Configuration/marte_cpp_code_templates.xml.
Select C/C++ → Code Style → Formatter and click on Import;
Select the file
Docs/Assets/Configuration/marte_cpp_formatting_rules.xml.
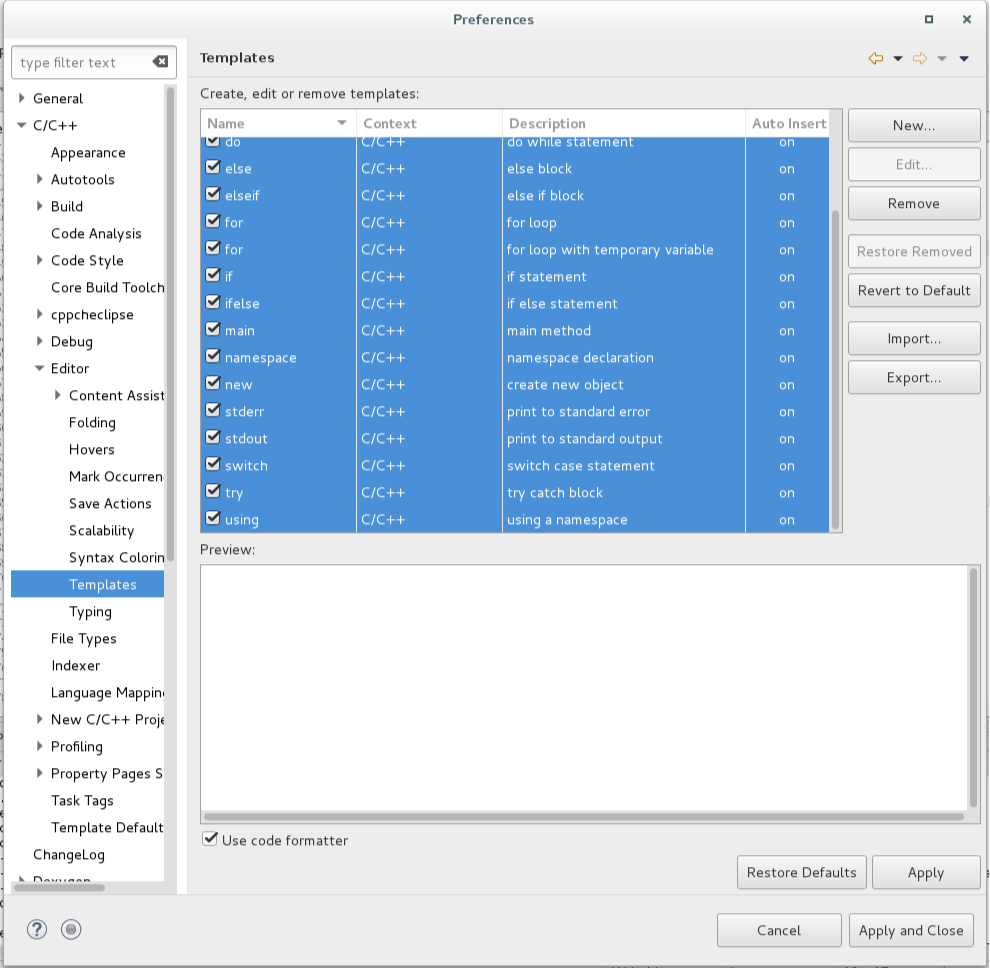
Select C/C++ → Editor → Templates and click on Import;
Select the file
Docs/Assets/Configuration/marte_cpp_editor_templates.xml.Select the “Use code formatter” option.
Select General → Editor → Text Editors → Spelling*;
Make sure to select first the option
Enable spell checking;In User defined dictionary click on Browse… and select the file
.dictionarywhich is the root folder of theMARTe2-devrepository (in Linux this file may not be visible in the dialog and consequently its path needs to be explicitly written in the text field).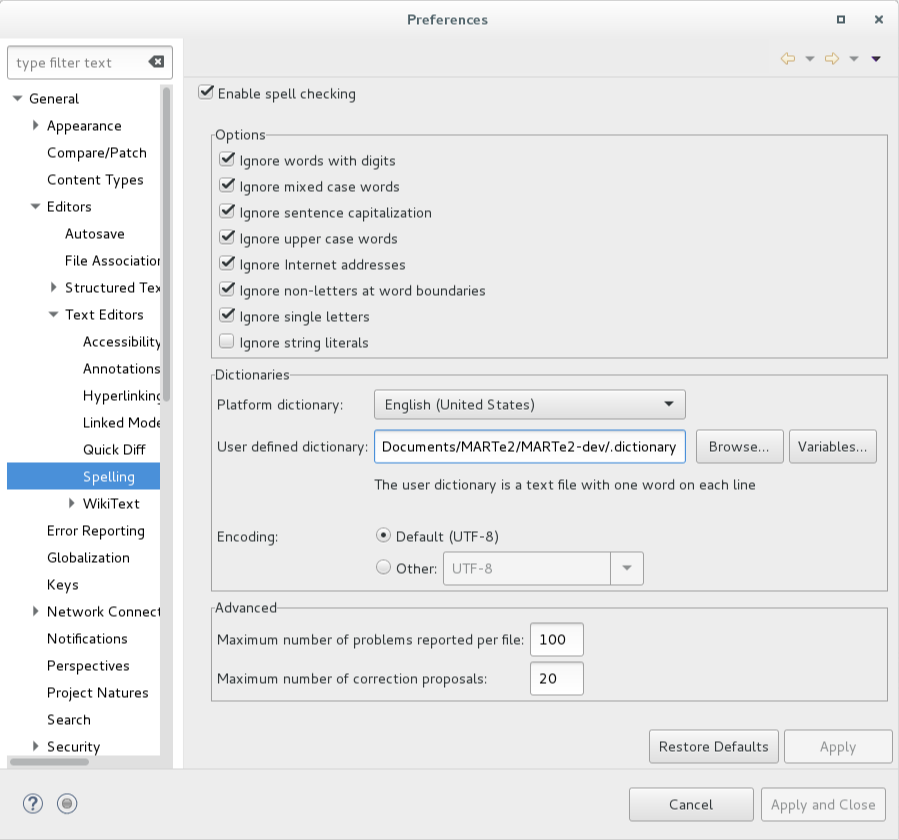
Click Apply and Close to close the Preferences window.
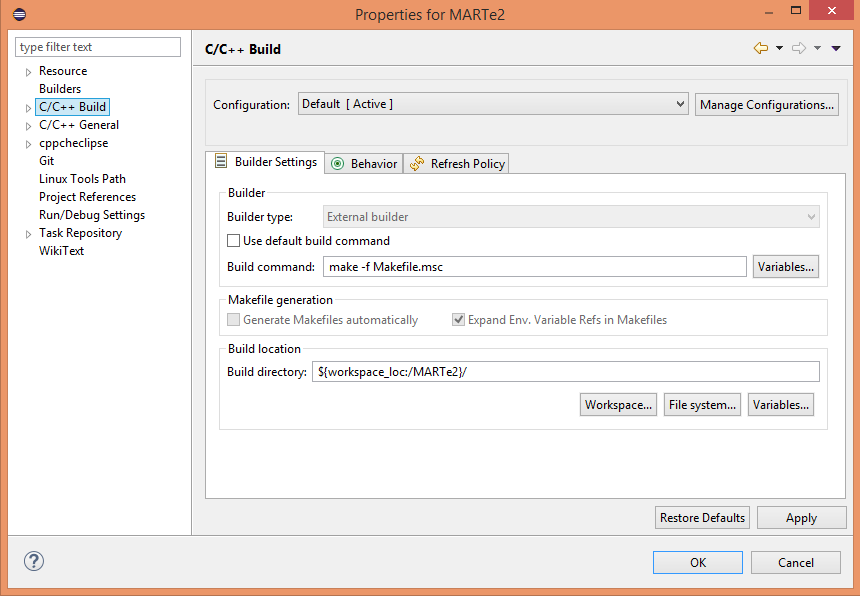
Open Project → Properties;
Select C/C++ Build;
Unselect Use default built command;
In the Build command text field:
Write
make -f Makefile.mscif you are developing in Microsoft Windows;
Write
make -f Makefile.linuxif you are developing in Linux;
If you are developing in Microsoft Windows:
Open a Windows console (cmd.exe) and type
vcvars32if you are compiling in 32 bits orvcvars64if you are compiling in 64 bits;Go back to the eclipse project properties (but leave the Windows console opened);
Select Environment (under C/C++ Build in the tree)
Click on Add
Write
INCLUDEin the Name text field;In the Windows console type
echo %INCLUDE%Write the output of the previous command in the VALUE text field;
Select Add to all configurations;
Click on Add
Write
LIBin the Name text field;In the Windows console type
echo %LIB%Write the output of the previous command in the VALUE text field;
Select Add to all configurations;
Click on Add
Write
PATHin the Name text field;In the Windows console type
echo %PATH%Write the output of the previous command in the VALUE text field;
Select Add to all configurations;
Click on Apply;
Close the Windows console;
Select C/C++ General → Paths and Symbols;
Select the # Symbols tab;
Select [ All configurations ] in the Configuration list;
Select GNU C in the languages list;
Click on Add:
Write
ARCHITECTUREin the Name text field;Write
x86_clin the Value text field if you are developing in Microsoft Windows;Write
x86_gccin the Value text field if you are developing in Linux;
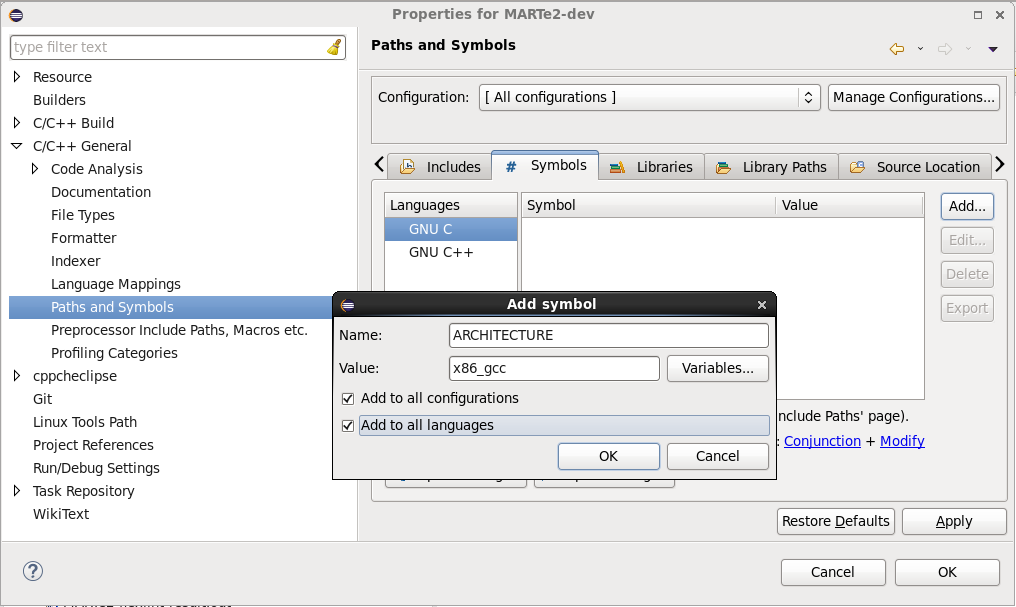
Select Add to all configurations;
Select Add to all languages;
Click OK;
Click on Add:
Write
ENVIRONMENTin the Name text field;Write
Windowsin the Value text field if you are developing in Microsoft Windows;Write
Linuxin the Value text field if you are developing in Linux;Select Add to all configurations;
Select Add to all languages;
Click OK;
Click Apply and Close to close the Properties window.
Compile the project by selecting Project → Build All;
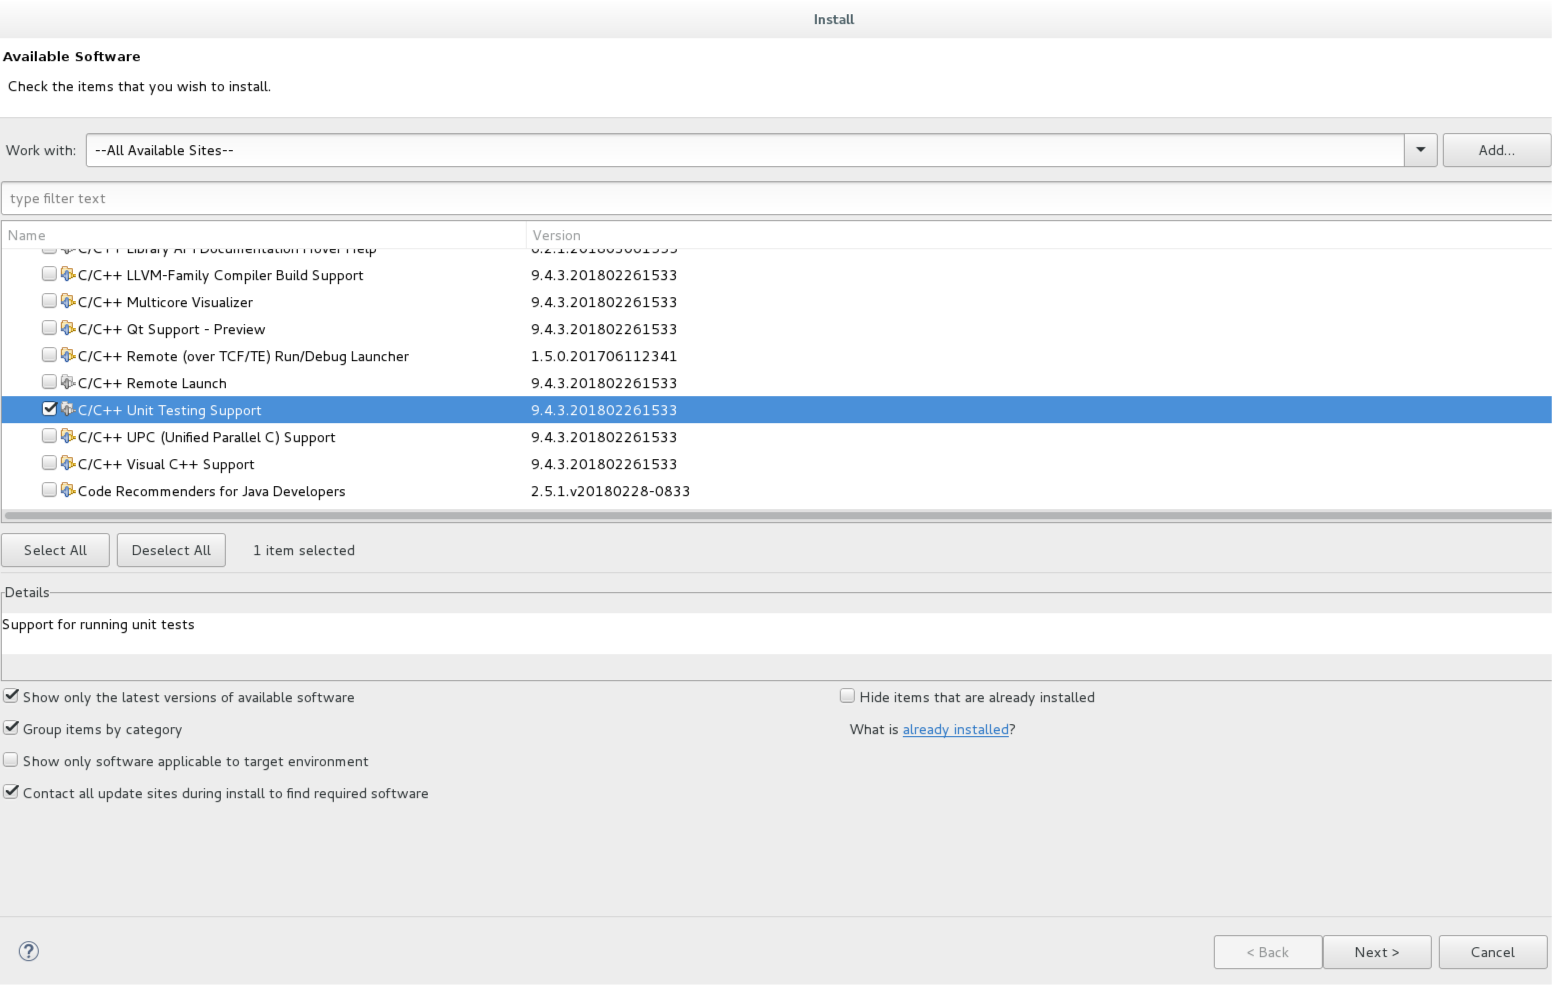
Select Help → Install New Software;
Select Work with -
-All available sites-;Select Programming Languages → C/C++ Unit Testing Support;
Click on Next and follow the instructions;
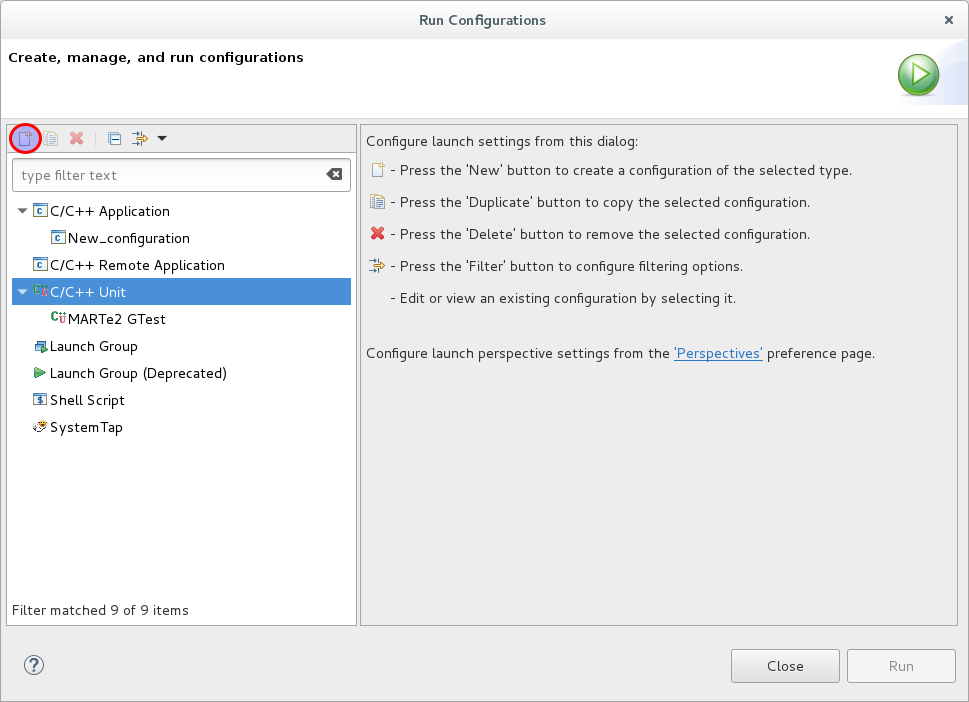
Open Run → Run Configurations;
Select the C/C++ Unit on the left pane;
Press the New launch configuration button (on the top left side);
Select the Main tab;
Write
MARTe2 GTestin the Name text field;Write
MARTe2-devin the Project text field;In the C/C++ Application text field:
Write
Build\msc\GTest\MainGTest.exeif you are developing in Microsoft Windows;Write
Build/x86-linux/GTest/MainGTest.exif you are developing in Linux;
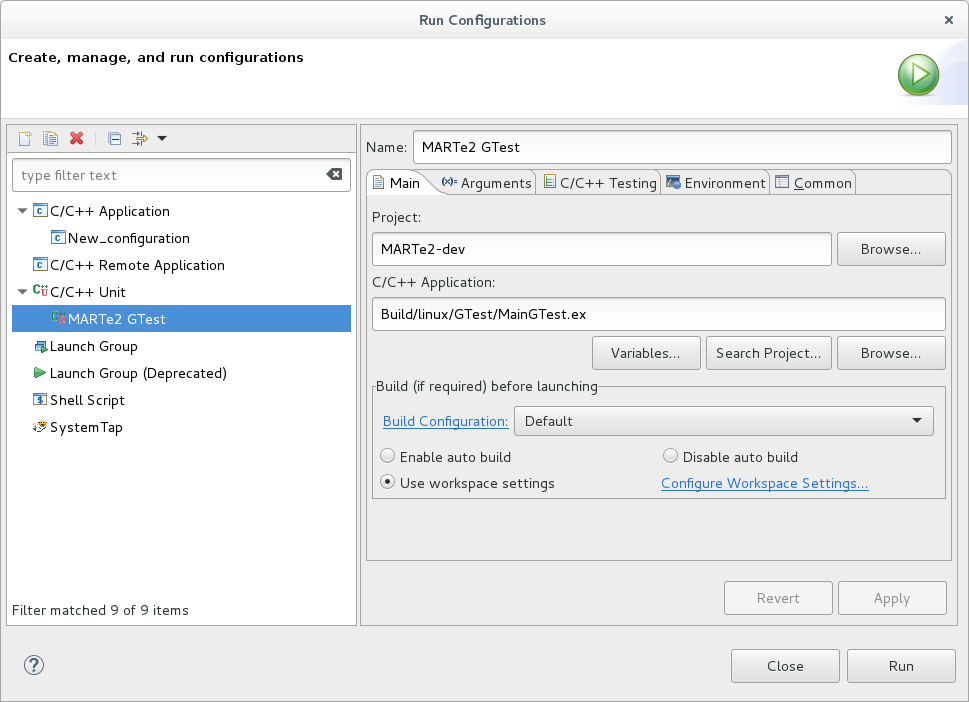
In the Build configuration select Default;
Select the C/C++ testing tab;
In the Tests Runner drop-box, select
Google Tests Runner;
Select the Common tab;
Select
Runin the Display in favorites menu pane;
If you are developing Microsoft Windows:
Select the Environment tab;
Click on New…;
In the Name text field write
PATH;In the Value text field write
${workspace_loc:/MARTe2-dev}/Build/msc/Core
Make sure that the radio button Append environment to native environment is selected;
Click on Apply;
Click on Run to check if everything was setup properly and then Close.
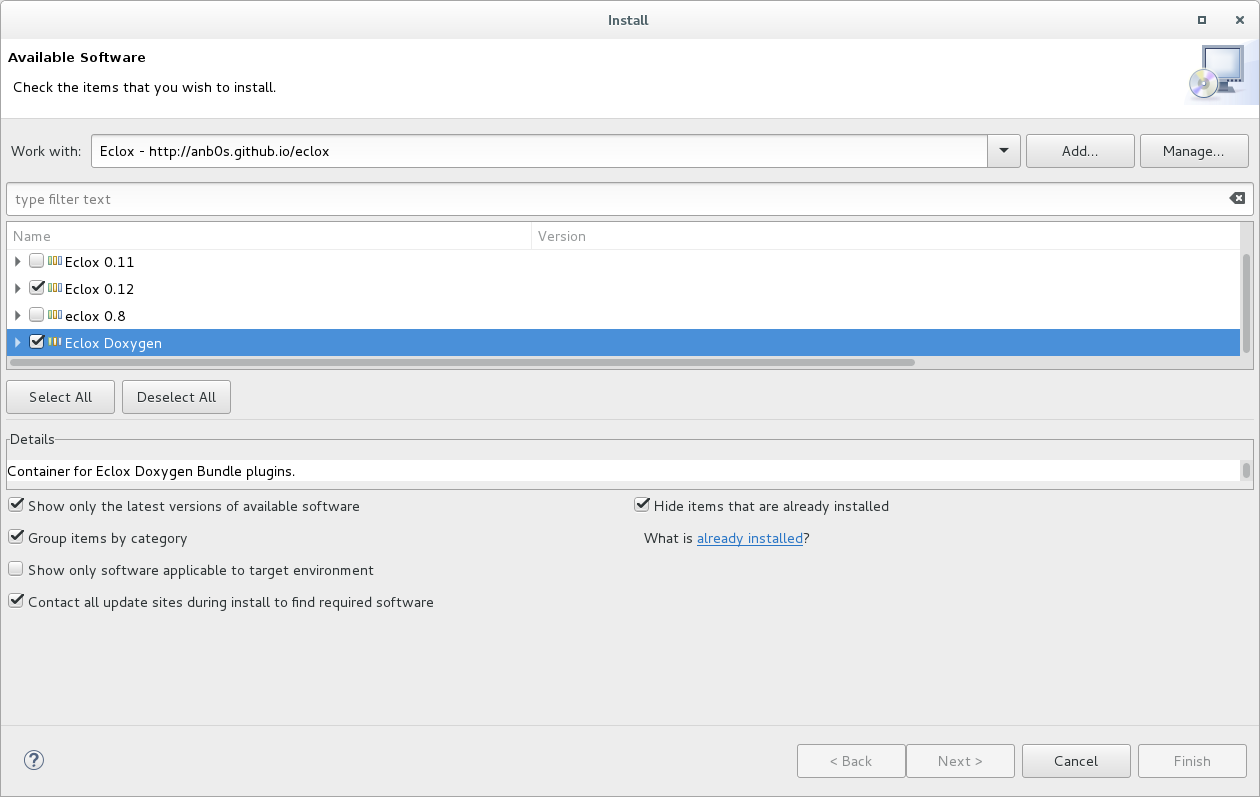
Select Help → Install New Software;
Click on the Add.. button;
In the Name text field write
Eclox;In the Location text field write:
http://anb0s.github.io/eclox;
In the Work with select
Eclox - http://anb0s.github.io/eclox;Select
eclox 0.12andEclox Doxygenin the menu;Click on Next and follow the instructions to install the pulg-in.
On the toolbar click in the @ sign and select Build Doxyfile.
Select the MARTe2-dev → Doxyfile;
Click OK;
Verify that html files are created in
MARTe2-dev/Build/dox/htmldirectory.
Select Help → Eclipse MarketPlace.
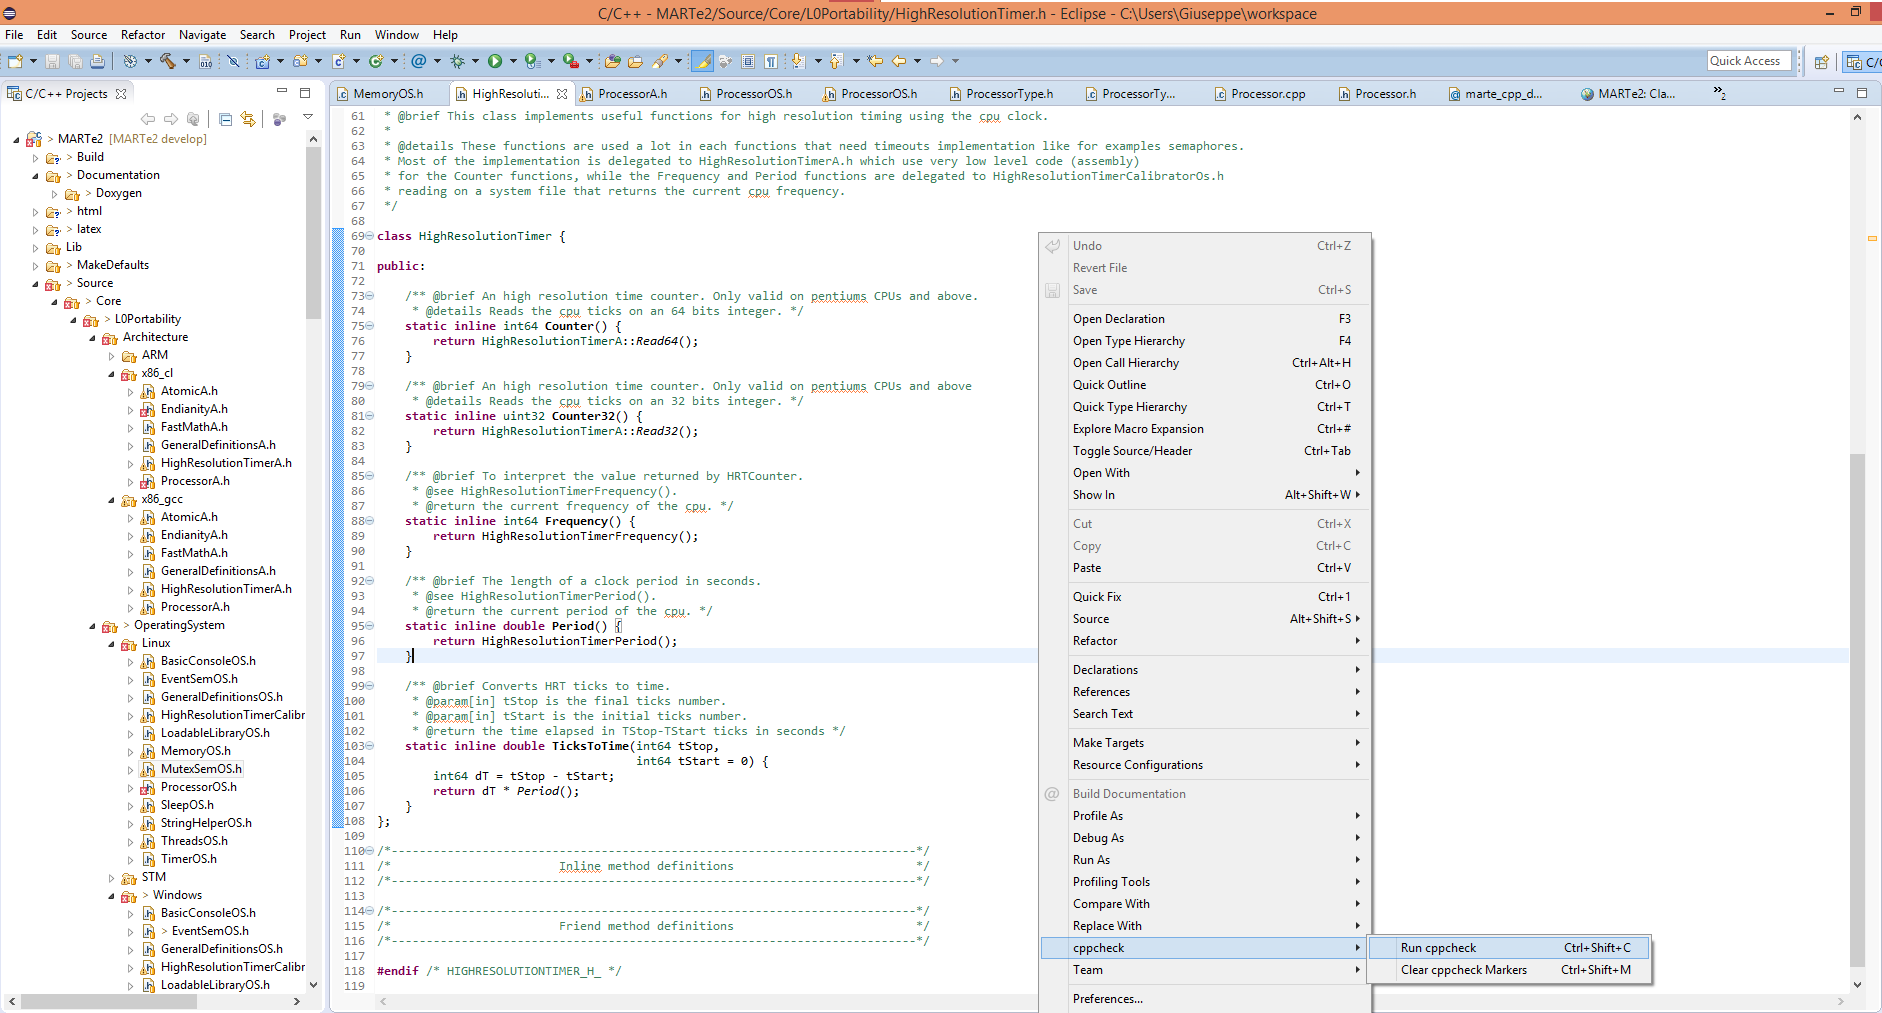
Search for
cppcheclipseand install it following the instructions.
Coverage
Linux developers can integrate the coverage tool (lcov) with-in the eclipse development environment. It should be noted that the gcov integration delivered with the Linux Tools - Gcov Support does not work well with the folder structure of the MARTe2 project.
Open Run → External Tools → External Tools Configurations…;
Click New launch configuration
In the Name text field write:
MARTe2 lcovSelect the Main tab:
In the Location text field write:
${workspace_loc:/MARTe2-dev/EclipseLcov.sh}In the Working Directory text field write:
${workspace_loc:/MARTe2-dev}
Select the Refresh tab:
Select Refresh resources upon completion.
Select The project containing the selected resources
Mark Recursively include sub-folders
Select the Build tab:
Unselect Build before launch
Select the Common tab:
Select External Tools in the Display in favorites menu pane.
Click Apply;
Click Run.
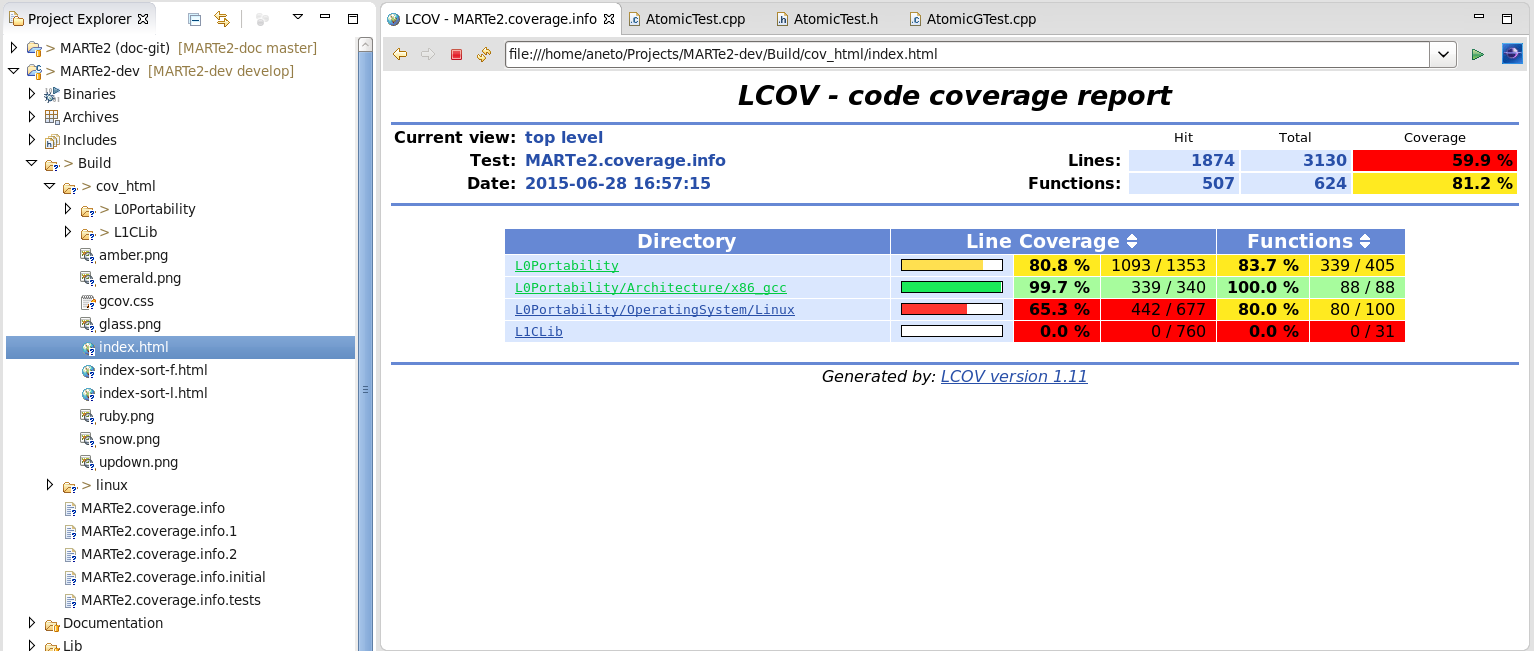
The coverage html will be generated in a folder named cov_html under the Build folder. Open the index.html file to browse the results.
Linting
Core developers in the F4E premises can configure the linting procedure as follows:
Make sure that you can login using SSH to the lint server (defined with the variable HOST) using public key authentication (i.e. without a password);
Open Project → Build Configurations → Manage;
Click New;
In the Name text field write
MARTe2 linting;In the Description text field write
MARTe2 linting procedure;Select Default in the Copy settings from → Existing configuration list;
Click OK;
Open Project → Properties;
Select C/C++ Build
Select
MARTe2 lintingin the Configuration list;Unselect Use default built command;
In the Build command text field:
Write the full path to the
EclipseLint.batscript if you are developing in Microsoft Windows;Write the full path to the
EclipseLint.shscript if you are developing in Linux;
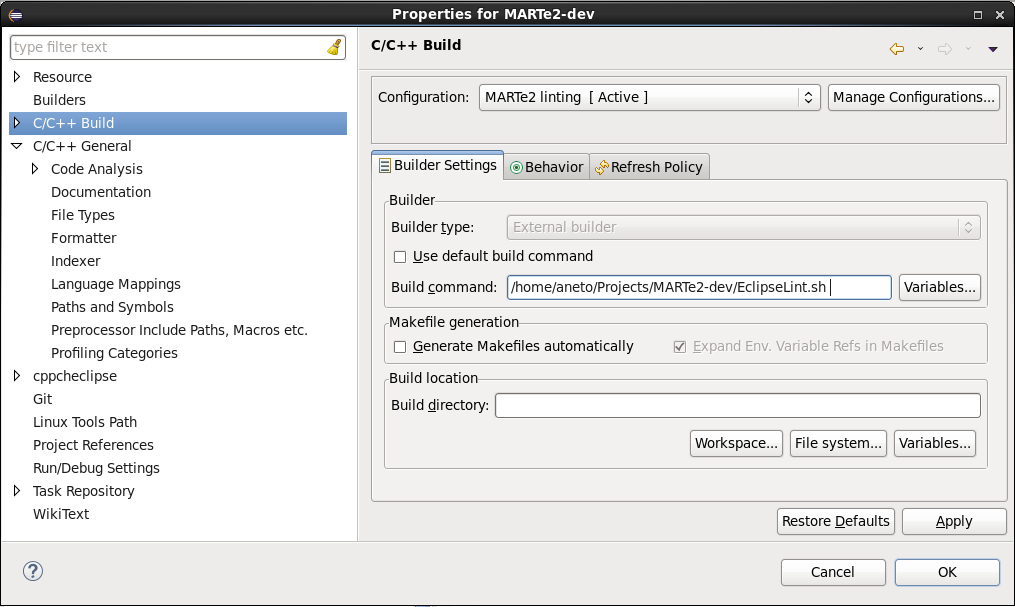
Unselect Generate Makefiles automatically;
In the Build directory text field write
${workspace_loc:/MARTe2-dev}In the Behavior tab:
Unselect Stop on first build error;
Unselect Clean;
Click Apply and close.
Tips and tricks
To format code, click on the file that you want format and then select Source → Format.
The html generated by eclox will be available in a folder named html under the Assets → Configuration folder.
To run CppCheck, open the file that you want to check and do right click → cppcheck → Run cppcheck.